Sewing machines: Difference between revisions
m (→Warning) |
|||
| Line 17: | Line 17: | ||
===Warning=== | ===Warning=== | ||
On no account use anything but sewing machine oil to lubricate the mechanism. Do not use WD40, or 3-in-1, or bicycle oil, or engine oil, or grease, or olive oil, or Vaseline, or snake oil, or peanut butter. None of these are sewing machine friendly. | On no account use anything but sewing machine oil to lubricate the mechanism. Do not use WD40, or 3-in-1, or bicycle oil, or engine oil, or grease, or olive oil, or Vaseline, or lubricating jelly, or snake oil, or peanut butter. None of these are sewing machine friendly. | ||
===Spare parts=== | ===Spare parts=== | ||
Revision as of 12:05, 1 February 2016
This page covers the maintenance of domestic sewing machines.
Summary
Older sewing machines are virtually indestructible and with simple maintenance can continue to give good service almost indefinitely. Newer machines often have plastic parts which wear out quite quickly. Nevertheless, all machines can give longer service, properly cared for.
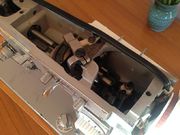
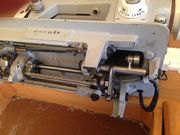
The descriptions and accompanying pictures in this page show a vintage sewing machine probably dating from the 1950's or 60's. The advantage for demonstration purposes is that this has all the basic controls and mechanisms, easily seen rather than hidden behind plastic.
Safety
- Always unplug from the mains before starting any maintenance or repair work, in order to eliminate the risk of electric shock or physical injury from moving parts.
- When plugged in, at all times make sure either that all fingers are well away from moving parts, especially the needle, or that your feet (and anyone else's) are well away from the foot pedal.
- Sewing machine oil is highly flammable and can be ignited by overheating parts or sparks from the motor. Always wipe away any excess.
- Older machines particularly can easily weigh 20kg. Take care when lifting or when tipping over to service the under side.
Warning
On no account use anything but sewing machine oil to lubricate the mechanism. Do not use WD40, or 3-in-1, or bicycle oil, or engine oil, or grease, or olive oil, or Vaseline, or lubricating jelly, or snake oil, or peanut butter. None of these are sewing machine friendly.
Spare parts
Spare parts for modern machines may be available directly from the manufacturer or a distributor. For older machines, eBay is always a good place to look. Helen Howes in Norfolk holds a wide range of parts.
Bobbins and needles are available at any good haberdashers. Spare and alternative feet are commonly available (check the height of the fixing screw from the base of the machine) and replacement belts shouldn't be a problem, nor replacement rubber tyres for bobbin winders. Complete bobbin winders are available for classic Singer machines using a bullet-type shuttle, but for others there are many different designs and you may have more trouble.
Acknowledgements
This wiki pages is based on a Restart Skillshare session led by Jennie of Cheeky Handmades with assistance from traid.
Sewing Machine Basics
Regular users of a sewing machine will be familiar with its operation and can skip this section, which is provided for occasional users or those simply faced with a non-working machine.
Beginners may also like to refer to the online tutorial Sewing Machine 911. (Free registration required.)
Sewing Machine Controls
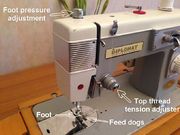
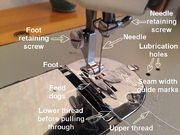
At the business end of the sewing machine, the foot presses down on the work, enabling the feed dogs below to feed it through the machine by a kind of walking motion. Alternative feet may be provided for different jobs. They are secured to the vertical shaft with a knurled knob.
A screw or knob clamps the needle to its shaft. Needles normally have a flat side which clamps against the flat of the shaft.
An adjustment on the top allows the pressure of the foot on the work to be adjusted.
The top thread passes through an adjustable tensioner, allowing the tension of the top thread to be equalised with that of the bottom thread. When properly adjusted, the threads should engage with one another within the fabric. Badly adjusted, the top thread will lie on top of the fabric or the bottom thread on the bottom, with the other thread passing through the fabric and back again.
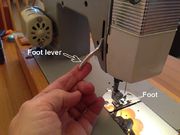
Behind the head of the machine a lever allows the foot to be raised in order to insert or withdraw the work, and lowered in order to sew. This is normally operated blind by feel.
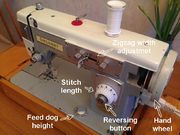
The hand wheel on the right is driven by a belt from the motor. You can turn it by hand to stitch one stitch at a time, or to ensure the needle is disengaged before inserting or removing the work. Always turn it towards you (the same direction as the motor turns it) and never backwards.
A bobbin winder (missing on this particular machine) engages with the hand wheel in order to load bobbins with thread. A knurled knob on the hand wheel allows it to be disengaged from the sewing machine mechanism whilst winding bobbins.
The stitch length adjuster varies the distance the work is moved between stitches. The reversing button (or lever) allows you to sew in the reverse direction. (You should always do a couple of reverse stitches at the start and end of a line of stitching to lock the ends.)
The zigzag width control allows alternate stitches to be offset sideways to produce zigzag stitching. More modern machines often have a plethora of stitching styles controlled in a similar way.
The feed dog height adjustment allows the feed dogs to optimally grip fabrics of different types.
Common problems and solutions
Breaking needles
First of all, ensure you've threaded the machine correctly. It may be that you are using the wrong type of needle. For normal use on light fabrics, a size 10 or thereabouts should work well, but on heavier cloth such as denim or canvas a needle size up to 16 will be required. For leather or vinyl you will need a wedge-point needle.
Machine seized up
After many years of disuse a machine may completely seize up. Lubricate thoroughly as described under Maintenance. You may have to leave the oil for a while in order to ease the parts and repeat several times, wiping away any excess.
Snagging or breaking thread
First of all, if you have disassembled anything, make sure you have reassembled it correctly and that you can turn the hand wheel freely. Ensure the needle isn't bent and that it feels smooth as you run it between your fingers from the shank to the tip. A new needle is recommended after 6 - 8 hours of sewing.
Make sure the machine is threaded correctly with good quality thread - an incorrectly threaded machine will never work. If you don't have a printed instruction booklet, look on the Internet for instructions for the same or a similar model. On some machines you thread the needle from left to right, and from right to left on others. It's important to get it right.
Check that the needle is fitted correctly. The flat on the shank of the needle lies against a flat on the needle holder with the needle pushed up as high as it will go. Tighten the screw but only as much as you can with your fingers.
Ensure the bobbin is the correct type for the machine and is threaded and fitted correctly. There are several types of bobbin, subtly different. The bobbin case holder has a sharp point which catches the top thread. Problems can result if this has been roughened by needle strikes. Smooth it with fine emery as described under Maintenance.
Before starting to sew, make sure there isn't excessive slack in the top thread. If you have just fitted the bobbin, place your finger on the loose end of the top thread and turn the hand wheel as if to make one stitch. When you now pull the top thread it should draw up the bottom thread. Place your finger on the loose ends of both threads as you make the first stitch or two otherwise they may snag.
Poor speed control
If nothing happens when you press the foot pedal a little, but the machine races when you press it just a little more then it will be very hard to sew successfully. The foot pedal may simply need lubricating. On older machines this will contain a rheostat, which is a variable resistance wired in series with the motor. Newer machines will more likely have an electronic speed control similar to a dimmer switch.
First, double check that it's not still plugged in. You will need to examine it to determine how to disassemble it. Do not use sewing machine oil, but rather any light lubricating oil, or grease on sliding parts, and keep oil and grease away from all electrical contacts.
Also, check the belt tension. Check out the page on Electric motors if the motor may be faulty. Replacing the brushes or cleaning the commutator might be necessary. The motor bearings can be lubricated with light lubricating oil.
Maintenance
The first thing to do (before disassembly) is to remove all dust and fluff. Between the feed dogs is a favourite place for it to collect. Remove the needle plate (through which the feed dogs protrude) to facilitate cleaning. Where it has become matted you can pick it out with a pin or a needle, otherwise use a brush and/or a vacuum cleaner crevice tool. You can use a can of compressed air but be careful you don't simply blow the fluff further into the mechanism. Look out for any pieces of broken needle which have come to rest here and might jam the mechanism.
Check for and remove any dust, fluff or pieces of broken thread where the thread passes between the discs of the upper tension adjuster.
A well used machine may need lubrication and cleaning several times a year. Once a year is beneficial even for light or occasional use. Older machines allow easy access to the mechanism. Newer machines tend to be completely enclosed in plastic. There may be screws holding the case together but even after removing these it may be tricky to open. If the case is in two halves, probe the crack between them. You will probably find a series of clips that can be released with a thin spatula or knife, or a prying tool, or it may become evident that there remain one or more screws to remove.
Next, oil anything that moves. Remember, use nothing but sewing machine oil. There will be various levers, cams, cogs and bearings both in the top of the machine driving the needle, and under the base driving the bobbin and feed dogs. Apply no more than a drop of oil, wipe away any excess, and avoid getting it anywhere where it could contaminate the next sewing job.
Remove the bobbin and bobbin case, and any dust or fluff on them. The bobbin case fits into a bobbin case holder which rotates as the machine operates. It should be easily removed, for example by releasing a pair of clips on a retaining ring. It has a sharp point which catches the upper thread in order to engage it with the lower thread. Run your finger over this and if it feels rough (probably due to needle strikes) then smooth it with fine emery. Take care to reassemble it correctly.
Note that some older (especially pre-war) machines have a quite different design of bobbin. This fits in a bullet-shaped shuttle which is thrown through a loop in the upper thread to make each stitch. Modern machines either have front loading bobbins similar to the photos though often accessed from the front of the machine, or top loading bobbins where a similar mechanism is mounted horizontally.
Check for any roughness on the needle, possibly caused by it striking something. It can be smoothed with fine emery but is probably better replaced and should be replaced as a matter of course after 6 - 8 hours of sewing.
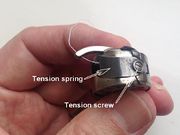
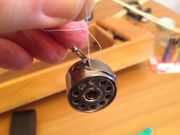
It's important to check the bobbin tension as you will get poor results and possibly broken or snagging thread if it's wrong. Fit a bobbin of thread to the bobbin case and thread it under the tension spring. Suspend it by the thread. The tension is correct if the tension is just sufficient to support the weight of the bobbin and case. Adjust the tension by adjusting the screw in the tension spring.
Finally, examine the bobbin winder. This often engages with the hand wheel by means of a wheel with a rubber tyre. If the tyre is worn or cracked or perished, replace it. Spares are generally easy to obtain.
