Magnifiers and Inspection Aids: Difference between revisions
mNo edit summary |
|||
| (16 intermediate revisions by 2 users not shown) | |||
| Line 1: | Line 1: | ||
Modern electronic devices are often extremely compact and use tiny components with the result that identifying markings on them and faults such as solder bridges and dry joints can be very hard to see with the unaided eye. Various aids are described in this page. | |||
==Summary== | ==Summary== | ||
Many faults are identified visually, but some are hard to see with the naked eye. A good light and some form of magnification makes it a lot easier. | Many faults are identified visually, but some are hard to see with the naked eye. A good light and some form of magnification makes it a lot easier. The purpose of this page is to describe the range of aids available. | ||
===Safety=== | ===Safety=== | ||
[[File:Warning03.png|30px|left]] | [[File:Warning03.png|30px|left]] | ||
::When working under a magnifier your face will usually be | ::When working under a magnifier your face will usually be much closer to the work. Take extra care with sharp tools, and to avoid breathing fumes when soldering. | ||
::Also, when working under a magnifier your peripheral vision may be restricted, limiting your view of nearby hazards. | ::Also, when working under a magnifier your peripheral vision may be restricted, limiting your view of nearby hazards. | ||
::LED lamps are often extremely bright. Try not to let them shine directly into your face as they may cause temporary blind spots. | ::LED lamps are often extremely bright. Try not to let them shine directly into your face as they may cause temporary blind spots. | ||
| Line 18: | Line 18: | ||
==Inspection Lights== | ==Inspection Lights== | ||
[[File: | A good light is essential for working on small items, whether natural light from a good sized window, a good room light, or a desk lamp. But you may well also need a torch of some sort. | ||
[[File:Head torch.jpg|200px|thumb|right|A head torch.]] | |||
These come in many forms. When the view is restricted, for example to examine a screw head at the bottom of a recess, you generally need something small that you can hold close to your eye (but shining away from it) in order to shine onto the subject. In other situations, oblique illumination works best as it avoids bright reflections from shiny surfaces. | These come in many forms. When the view is restricted, for example to examine a screw head at the bottom of a recess, you generally need something small that you can hold close to your eye (but shining away from it) in order to shine onto the subject. In other situations, oblique illumination works best as it avoids bright reflections from shiny surfaces. | ||
| Line 27: | Line 29: | ||
==Magnifying Glasses== | ==Magnifying Glasses== | ||
[[File:Img_1192a.jpg|200px|thumb|left|A pair of cheap readyspecs.]] | [[File:Img_1192a.jpg|200px|thumb|left|A pair of cheap readyspecs.]] | ||
[[File:Img_1206a.jpg|200px|thumb|right|Flip-up clip-on spectacles.]] | |||
If your distance vision is good (with contact lenses if worn) then a cheap pair of "readyspecs" makes close work very much easier. These are available without prescription from many outlets, at various strengths. Try a few pairs and select one that allows you to see clearly at the closest distance you could comfortably work at. The strength is measured in dioptres, and you will probably find a value of +3 to +4 will work well. If your near point without glasses is 25cm, a +4 pair would bring it in to half that distance. | If your distance vision is good (with contact lenses if worn) then a cheap pair of "readyspecs" makes close work very much easier. These are available without prescription from many outlets, at various strengths. Try a few pairs and select one that allows you to see clearly at the closest distance you could comfortably work at. The strength is measured in dioptres, and you will probably find a value of +3 to +4 will work well. If your near point without glasses is 25cm, a +4 pair would bring it in to half that distance. | ||
[[File:Img_1196a.jpg|200px|thumb| | [[File:Magnification-vs-Dioptres.png|300px|thumb|right|A table relating Magnification to Dioptres.]] | ||
If you wear glasses all the time and in particular if the prescription for your eyes is significantly different between right and left, a pair of clip-on flip-up magnifying glasses may be your best option. As a rough guide only you might try a + | [[File:Img_1196a.jpg|200px|thumb|left|Magnifying glasses.]] | ||
If you wear glasses all the time and in particular if the prescription for your eyes is significantly different between right and left, a pair of clip-on flip-up magnifying glasses may be your best option. | |||
As a rough guide only, you might try a +1.5 dioptre pair if you don't use separate glasses for reading and distance, or to go with your reading glasses if you do. In the latter case you might try a 3.5 dioptre pair to go with your distance (only) glasses. | |||
[[File:Img_1197a.jpg|200px|thumb|left|An illuminated magnifying glass.]] | [[File:Img_1197a.jpg|200px|thumb|left|An illuminated magnifying glass.]] | ||
| Line 43: | Line 48: | ||
A jeweller's eye loupe is very useful, especially for very close inspection. A 5x magnification works well, allowing very small details to be seen. With a little practice you can hold it in your eye socket, leaving both hands free. | A jeweller's eye loupe is very useful, especially for very close inspection. A 5x magnification works well, allowing very small details to be seen. With a little practice you can hold it in your eye socket, leaving both hands free. | ||
==Microscopes== | |||
[[File:USB_Microscope.jpg|200px|thumb|right|A cheap USB microscope.]] For professional work or for regular micro-soldering a good microscope is essential. The gold standard is a quality optical binocular microscope but this would be uneconomic for occasional use. | |||
A much more affordable option is a cheap USB microscope, which can be had for under £20. These generally work under Windows and Mac and may well come with an Android app, but probably not an iOS app since iOS devices don't have a USB port. However, some come with a built-in screen. A disadvantage of USB microscopes is that the image is slightly delayed, making hand to eye coordination more difficult when microsoldering. | |||
==Other Magnifiers== | ==Other Magnifiers== | ||
For occasional use there are are several other options. | |||
[[File:Img_0811a.jpg|200px|thumb|left|Smartphone clip-on macro lens.]] | |||
A smartphone camera will often focus down to a few centimetres, and if in addition you zoom in you can get a very respectable magnification. You should be able to use the standard camera app on any smartphone, but check whether there's a magnifier or enhanced camera app. This may allow more control, such as brightness and contrast, focus lock and switching on the torch. | |||
The magnification can be increased even further with a smartphone clip-on macro lens, but at higher magnifications, holding it steady becomes a problem. | |||
A | [[File:Img_1209a.jpg|200px|thumb|right|A pen style pocket microscope.]] | ||
Pocket microscopes are available for around £10, some in the style of a pen or other easily pocketable form, and some with a built-in LED. These tend to have a limited field of view. In common with other simple optical microscopes they present an upside down image. | |||
==On the Cheap== | |||
A very simple solution if you have nothing else to hand is a pinhole. Take a sheet of paper or card and make a hole in it with a pin, a sharp pencil tip or any similar implement. Hold it as close to your eye as possible then examine the object through the hole. You will need a good light. It should be in focus up to half the normal distance from your eye, effectively giving you 2x magnification. | |||
A | A strong light allows the pupil of the eye to close down allowing a greater range of distances to be in focus, as any photographer will know. The pinhole, being smaller than the minimum pupil size, simply extends this principle. | ||
[[Category: | [[Category:Skills]] | ||
Latest revision as of 17:01, 14 November 2022
Modern electronic devices are often extremely compact and use tiny components with the result that identifying markings on them and faults such as solder bridges and dry joints can be very hard to see with the unaided eye. Various aids are described in this page.
Summary
Many faults are identified visually, but some are hard to see with the naked eye. A good light and some form of magnification makes it a lot easier. The purpose of this page is to describe the range of aids available.
Safety
- When working under a magnifier your face will usually be much closer to the work. Take extra care with sharp tools, and to avoid breathing fumes when soldering.
- Also, when working under a magnifier your peripheral vision may be restricted, limiting your view of nearby hazards.
- LED lamps are often extremely bright. Try not to let them shine directly into your face as they may cause temporary blind spots.
Introduction
Young people with normal sight can often focus on objects as close as 5 or 10cm, but our "near point" (as it's called) recedes with age. This varies from person to person but typically might start to become noticeable around the age of 40. The near point for a person with normal sight is generally considered to be around 25cm. Once your near point exceeds that your optometrist may recommend reading glasses, but well before then you will benefit from some form of aid for very close work.
The simplest aid is good light, whether natural or artificial. Under strong light the pupil of the eye reduces in size, increasing the range of distances that are in focus. Photographers will be familiar with exactly the same effect, as an increase in depth of focus with a reduced lens aperture.
The other simple aid is a magnifying glass. What this does is to bring the near point closer, allowing smaller details to be seen.
Inspection Lights
A good light is essential for working on small items, whether natural light from a good sized window, a good room light, or a desk lamp. But you may well also need a torch of some sort.
These come in many forms. When the view is restricted, for example to examine a screw head at the bottom of a recess, you generally need something small that you can hold close to your eye (but shining away from it) in order to shine onto the subject. In other situations, oblique illumination works best as it avoids bright reflections from shiny surfaces.
Modern inspection lights use LEDs, giving a very bright light.
A small LED torch is invaluable for general use. A head torch strapped onto the forehead leaves both hands free and gives illumination from a point close to the eyes. A small torch with the LED on the end of a flexible goose-neck allows you to get the light into inaccessible spaces.
Magnifying Glasses
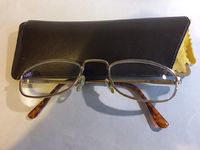
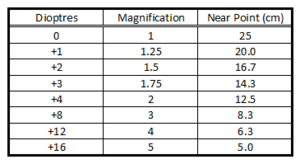
If your distance vision is good (with contact lenses if worn) then a cheap pair of "readyspecs" makes close work very much easier. These are available without prescription from many outlets, at various strengths. Try a few pairs and select one that allows you to see clearly at the closest distance you could comfortably work at. The strength is measured in dioptres, and you will probably find a value of +3 to +4 will work well. If your near point without glasses is 25cm, a +4 pair would bring it in to half that distance.
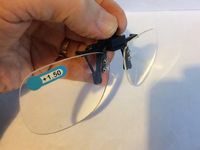
If you wear glasses all the time and in particular if the prescription for your eyes is significantly different between right and left, a pair of clip-on flip-up magnifying glasses may be your best option. As a rough guide only, you might try a +1.5 dioptre pair if you don't use separate glasses for reading and distance, or to go with your reading glasses if you do. In the latter case you might try a 3.5 dioptre pair to go with your distance (only) glasses.
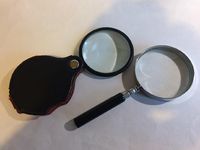
Magnifying glasses come in a range of sizes, strengths and styles. The strength is given as a magnification, e.g. 2x. This means that for a person with a near point of 25cm, held close to the eye it will bring your near point to half of that, resulting in an image twice the size on your retina. From this you can see that a pair of +4 dioptre glasses are the same as a 2x magnifying glass.
Beyond around 5x the aberrations inherent in a simple lens start to reduce its effectiveness. Magnifying glasses with higher quality compound lenses are available at a price.
For most purposes you will get the best results by holding a magnifying glass close to your eye then moving the object towards you until it's in focus, rather than holding the magnifying glass close to the object.
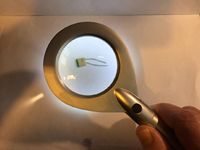
You may be able to find a magnifying glass with built-in illumination. These are often used by the partially sighted.
A jeweller's eye loupe is very useful, especially for very close inspection. A 5x magnification works well, allowing very small details to be seen. With a little practice you can hold it in your eye socket, leaving both hands free.
Microscopes
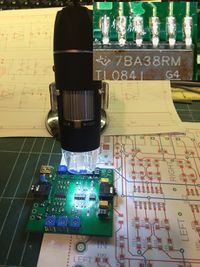
For professional work or for regular micro-soldering a good microscope is essential. The gold standard is a quality optical binocular microscope but this would be uneconomic for occasional use.
A much more affordable option is a cheap USB microscope, which can be had for under £20. These generally work under Windows and Mac and may well come with an Android app, but probably not an iOS app since iOS devices don't have a USB port. However, some come with a built-in screen. A disadvantage of USB microscopes is that the image is slightly delayed, making hand to eye coordination more difficult when microsoldering.
Other Magnifiers
For occasional use there are are several other options.
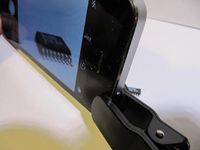
A smartphone camera will often focus down to a few centimetres, and if in addition you zoom in you can get a very respectable magnification. You should be able to use the standard camera app on any smartphone, but check whether there's a magnifier or enhanced camera app. This may allow more control, such as brightness and contrast, focus lock and switching on the torch.
The magnification can be increased even further with a smartphone clip-on macro lens, but at higher magnifications, holding it steady becomes a problem.
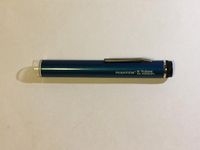
Pocket microscopes are available for around £10, some in the style of a pen or other easily pocketable form, and some with a built-in LED. These tend to have a limited field of view. In common with other simple optical microscopes they present an upside down image.
On the Cheap
A very simple solution if you have nothing else to hand is a pinhole. Take a sheet of paper or card and make a hole in it with a pin, a sharp pencil tip or any similar implement. Hold it as close to your eye as possible then examine the object through the hole. You will need a good light. It should be in focus up to half the normal distance from your eye, effectively giving you 2x magnification.
A strong light allows the pupil of the eye to close down allowing a greater range of distances to be in focus, as any photographer will know. The pinhole, being smaller than the minimum pupil size, simply extends this principle.
